Want to compare your webpages to know which one performs the best? Google Analytics makes it possible to setup an experiment.
This tutorial will walk you through step-by-step to setup an experiment to track a click on a button.
Some people may feel this is a job for a webmaster, however as long as you have access the html code anyone can do this.
By the end of this article you will have an experiment running in your Google Analytics showing you which landing page is performing better.
Let’s begin
To run a Google Analytics experiment you need to do the following five steps:
- Add Google Analytics tracking code to the web pages you want to compare
- Create a Goal
- Add the Goal code
- Create a Google Analytics Experiment
- Add Google Experiment tracking code to both of the web pages in the experiment
Step 1: How to add Google Analytics to your website.
You can skip this step if you already have Google Universal Analytics setup on your site.
Make sure you have the latest version of Google Analytics code on the web pages you will be testing.
1. Sign In to your Google Analytics account and click on the website that you want to run the experiment on.
2. Click on the Admin link in the top bar

3. Click on the “Tracking Info” in the middle column under the property (website) you want the experiment on.
4. This will open a drop down list. Click on “Tracking Code” option.
This will open the Tracking Code page. You will see the Website Tracking code in a text area.
5. Copy and paste that code into your web pages. If you have existing Google Analytics code, replace it with this code. Google recently updated their code to Universal Analytics.
Save your web pages.
Step 2: Create a Goal in Google Analytics
Go back to your Admin in Google Analytics and click the “Goals” link.
1. Sign In to your Google Analytics account and click on the website that you want to run the experiment on.
2. Click on the Admin link in the top bar
3. Click on the “Goals” link

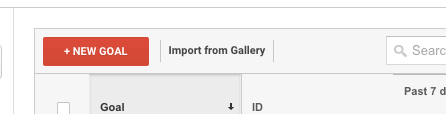
A new page will open.
4. Click the button “+ NEW GOAL”
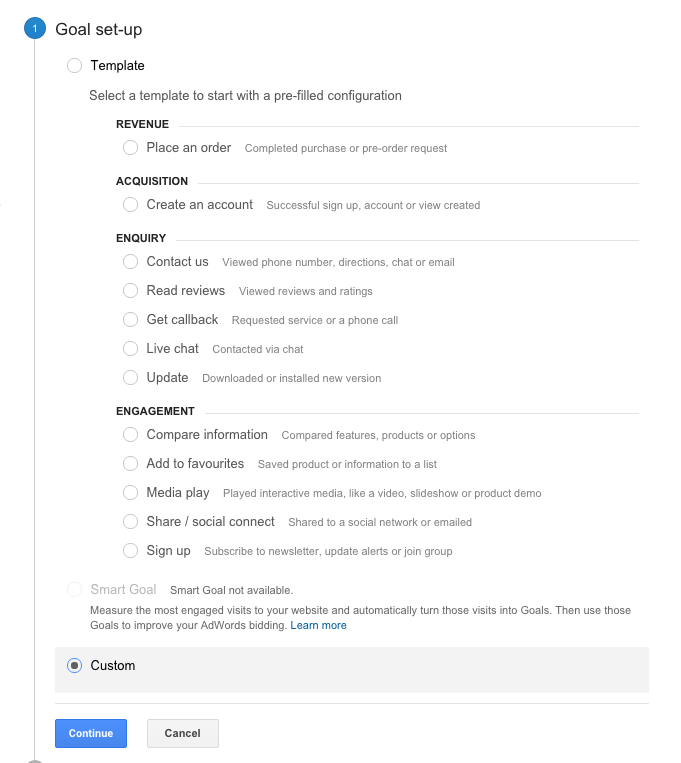
This will open a Goal set-up page
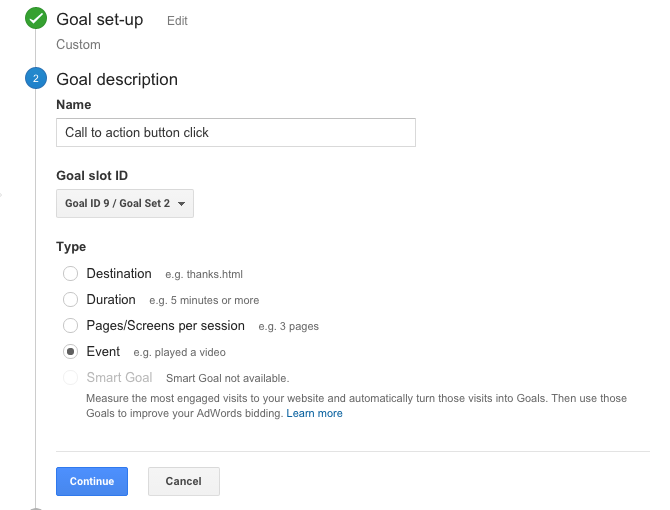
5. You will see Goal set-up. You can choose a template, but in this case we will be creating a Custom event.
Scroll down the page and click “Custom” then click “continue”
6. Enter a descriptive name for your Goal. Such as “Call to action button click”
7. Next, select the Type of Goal.
The options are as follows:
- Destination: Meaning the event will be recorded when a user visits a webpage.
- Duration: Meaning the event will will be recorded after a user visits a web page for a certain period of time.
- Pages/Screens per session: Mean after a user has visited a minimum number of pages
- Event: Meaning the event will be recorded when a user does an event, like click a button or watch a video.
We will select the forth option, “Event”
Click Continue
8. Now you will setup the event conditions. It’s really easy.
Fill in the following fields as follows:
Category: Call-To-Action
Action: Click
Label: Button
Value: 0
You can name them to whatever you like, as long as it makes sense to you. Button could be “Contact info” or “Book Demo”, etc. The value is the dollar amount the event is worth to you.
Remember the names as you will need them in the next step.
Leave the rest of the settings as they are.
9. Click Verify this Goal to see how many times this event would have fired on your website. It will probably show up at as 0% because the tracking code hasn’t been setup yet.
Step 3: Add your Goal code
Code is needed for event type goals. Other types of goals such as destination and duration don’t need code.
The code tells Google Analytics to record the event. Without it Google Analytics wouldn’t know when the goal was triggered.
To add the code is really easy. You just need to be able to edit the code of the web page.
1. Open the html code of the web page that has the event goal you want to track in the editor of your choice. For example, if you want to track a contact form button on the contact page, you will want to edit the contact page.
2. Find the location of the button. Add the following code to it.
onclick=”ga(‘send’, ‘event’, ‘category name’, ‘action name’, ‘label name (optional)’,’value (optional)’);”
It should look something like this for a link
<a href="" onclick="ga('send', 'event', 'Call-To-Action', 'Click', 'Button','0');" >Click me</a>
and this for a button
<button onclick="ga('send', 'event', 'Call-To-Action', 'Click', 'Button','0');">Click me</button>
![]()
3. Save your web page. You will need to apply this step to all pages that have this event that you want to track.
Step 4: How to create a Google Analytics Experiment
Once your goal is setup you are ready to create a Google Event
1. Click “Reporting” in the main navigation of Google Analytics

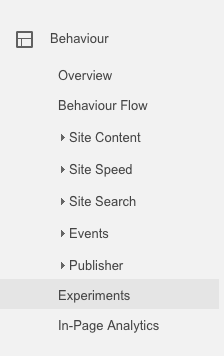
2. Scroll down the page and click “Behaviour” on the menu in the side bar. This will open sub links. Click “Experiments” from the list of links.
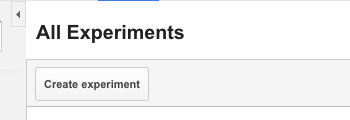
3. The experiments page will open. Click the “Create experiment” button
4. Now you will be able to create a new experiment.
a. Name your experiment. You will want the name to be descriptive so you will remember what you were comparing when you review it in the future.
“Split test of the … landing page – Comparing the number of call to action clicks”
b. Select a metric.
Click the Select a metric option. This will show a drop down of Goals. Open your Goal Sets and find your goal.

Once you’ve found your goal, click it and it will show in your experiment.
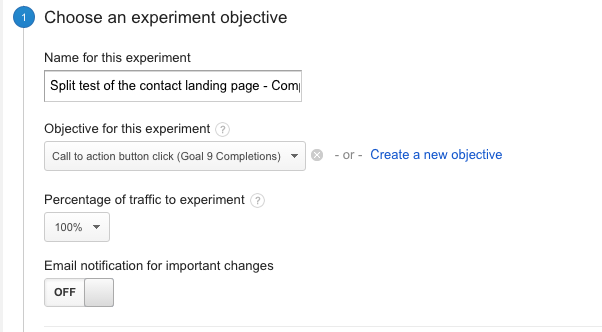
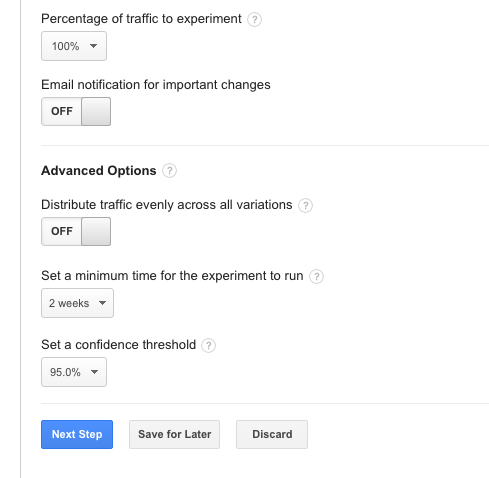
c. Choose the percentage of traffic to experiment.
You probably want to to test 100% of your traffic. However, if you only want to show the test to 50% of your traffic you can adjust it accordingly.
d. The advanced option drop down lets you set the duration of the test and the confidence threshold. I prefer to leave it setup with Google’s default settings.
e. Click Next Step
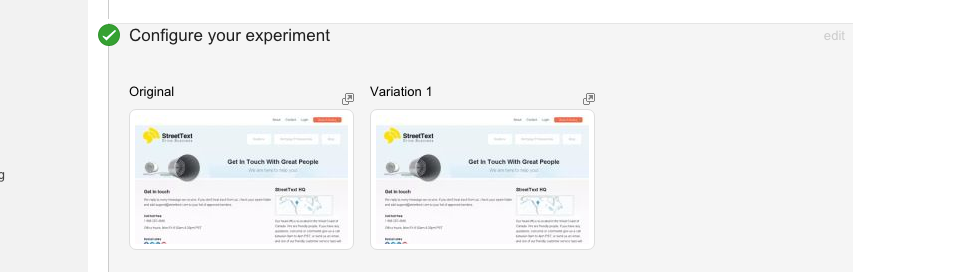
5. Configure your experiment
a. Now you will want to enter the URL of the webpage that you will be testing.
For example it may be the following url.
http://example.com/contact
A screenshot will load of the URL that you are testing.
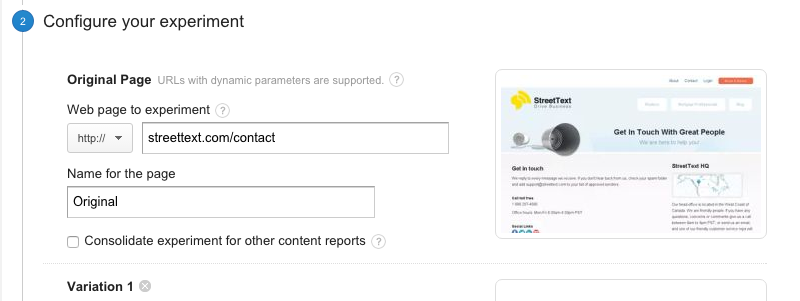
b. Next you will want to enter the URL of the web page to compare it to

c. Click Next Step
Congrats you’re almost done!
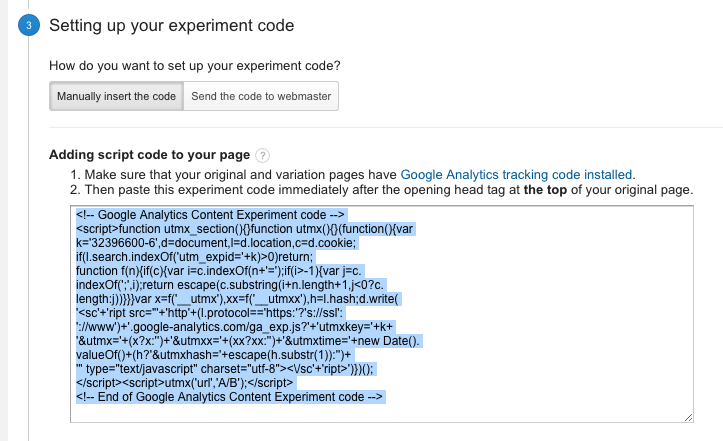
Step 5: Add Google Experiment tracking code to both of the web pages in the experiment
… Continuing from Step 4 part 5
1. Next you will need to insert the experiment code into both of the webpages you are testing.
Click “Manually insert the code”
Google Analytics will display the code.
2. Copy/paste the code immediately after the opening head tag at the top of your page <head>
3. Save both files. If you aren’t editing them directly on the web, make sure they are uploaded to the web.
4. Click Next Step
5. Review and start
Click “revalidate” to ensure that Google can find both your Google analytics code and the Experiment code.
If it can’t find the code, make sure the websites are updated. Some sites have caching enabled and you may need to wait a bit for them to update.
6. Finally click “Start Experiment”
Congratulations, you are done! You know have everything you need to setup and run split tests on your landing pages.
Best of luck with your conversion optimization.


2 Comments
i think step 5 #1 you only put the tracking code for GE into the top of the original (A)
Hi Jonathan, thanks for helpful tip